
Snowflake Pull-Apart Cupcakes
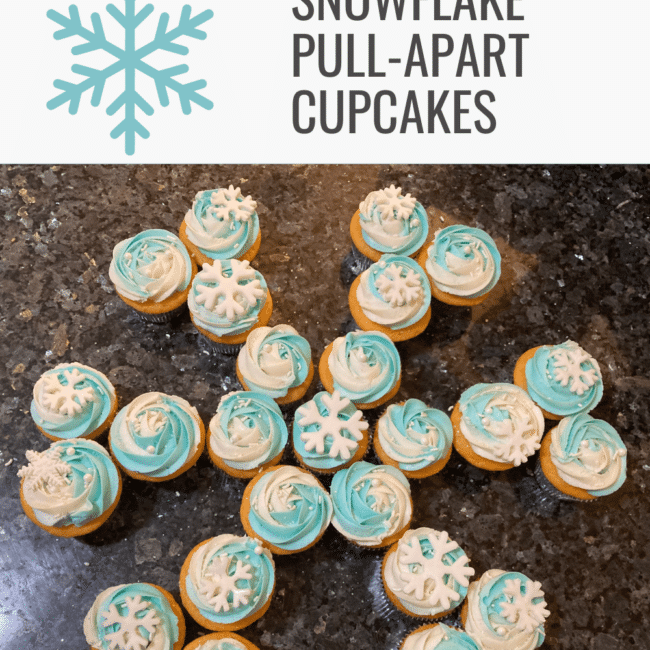
If you’re looking for a quick treat for an upcoming Christmas party, this is the post for you. In this post I’m going to show you how I made this simple pull-apart cupcake snowflake.

Pull Apart Cupcakes are Trendy!
If you’ve been on Pinterest any time in the last five years or so, you’ve probably noticed that there are a lot of pull-apart cupcake ideas on there.
Cupcake cakes are all the rage, and it's easy to see why. Many of them are absolutely adorable. And let's face it: cupcake pull-apart designs are conversational and easy to serve.
A few years back I made a wreath out of cupcakes.

And after that I made a really fun dachshund out of cupcakes. (You'll notice I use the Wilton 1 m tip a lot!)

I once made cupcakes into a flower arrangement. (They almost look real, don't they?)

Back in the day I used cupcakes to make a bridal cake. (So long ago that I don’t even have pictures anymore.)
This time, however? I needed something for Christmas. And I settled on this fun snowflake.

How many cupcakes should I make?
You will need a total of 21 cupcakes to make this giant snowflake.
A typical box of cake mix will make 17 - 18 cupcakes so I suggest doubling the recipe and having extras. You could even make a second (smaller) snowflake with the leftovers. (But, honestly? They're pretty enough on their own you could just serve them alongside the others.)

As for flavor, I decided to make orange creamsicle cupcakes, so that I would have a new recipe to share with you guys. Here’s how I did it:
Orange Creamsicle Cupcake Ingredients
FOR THE CUPCAKES
You will find a full printable recipe card at the bottom of this post but here's a quick look at what you'll need. These are simple ingredients you might already have on hand.

- yellow cake mix
- whole mil
- vegetable oil
- eggs
- orange jello
FOR THE FROSTING

- room temperature cream cheese
- room temperature butter
- Crisco
- powdered sugar
- vanilla extract (or orange extract)
- milk to thin (if necessary)
- sprinkles
- fondant for snowflakes (optional)
- teal/blue coloring gel to color half of the frosting
How to Make Creamsicle Cupcakes
Preheat oven to 350 degree Fahrenheit.
Place cupcake liners in the cupcake tins.

I usually mix the eggs first with the oil but in this case I (literally) just dumped everything into the mixing bowl and and mixed it up at medium speed.

I used the bowl of my stand mixer but you could even mix this by hand with a whisk or wooden spoon. It’s an easy recipe.

Check out that lovely orange color! (All of that from a simple box of jello!)

Use an ice cream scoop to scoop out the batter.

Bake cupcakes for 16 minutes at 350 until they're golden brown. They should spring back to the touch.

Remove from the oven and set aside to cool.

How to Make Dreamy Buttercream
Place cream cheese in mixer and beat until creamy.

Add butter and continue to mix until they come together and are light and fluffy in appearance.
Now it’s time to add the Crisco. (I don’t recommend the buttery-version, as it will change the color. You want a bright white.) Mix well until the whole thing looks light and dreamy.
Add the powdered sugar, a couple of cups at a time. Mix well.
If it’s too thick, thin it out a bit with milk.
How to Color Your Frosting
Place half of the frosting in a separate bowl and add a couple of drops of blue coloring gel. Stir well until the color is a shade you like.

You’ll need multiple piping bags.
I had enough frosting to fill three with white and three with blue. (Only five are pictured here.)

Now comes the fun part. Put a Wilton 1M tip into a large empty piping bag.
Add one bag of white frosting and one bag of blue, side-by-side.

Do a practice squirt until you see both colors coming out at once.
Now it’s time to swirl your cupcakes!

It’s so much fun to swirl on the dual-colored frosting. Start in the middle and go around, working your way out to the outer edge.

Make sure you color 25 cupcakes, because that’s the number you’ll need.
Let’s Put our Snowflake Together!
I’ve drawn a diagram so you can see how I made mine.
Start with one cupcake in the center and five around it.

Each of the five gets an additional one. (We’ll call these arms.)

Each arm gets two “hands.”

You’ll see a total of 21 cupcakes here.

If you’re feeding a larger crowd, no worries! Just squeeze in six cupcakes around the center one and do a total of six arms (twelve hands) for a fuller snowflake.
No matter how big you make it, this is a darling idea! And I’ll also share that this project takes up too much space to fit on a traditional cake board, which is why I set mine up directly on my island. You could put a pretty tablecloth underneath it if you like.
How to Decorate Your Cupcakes
I decided to add fondant snowflakes. I have a handy-dandy little fondant plunger that makes lovely snowflakes. If you don’t have that, just add pearls, sprinkles, or sanding sugar. The choices are endless!

Unlike other pull-apart cupcake projects, this one isn’t really stuck together. In other words, it’s not messy. It’s simple and fun and the creamsicle cupcakes are super tasty.

Variations on this recipe
Make it all in white. I think this snowflake would be gorgeous at a winter wedding, all decked out in white on white on white. I would definitely go with six arms for that project.
Mini cupcakes: If you want a smaller version of this project, simply bake up tiny cupcakes instead of regular-sized ones.
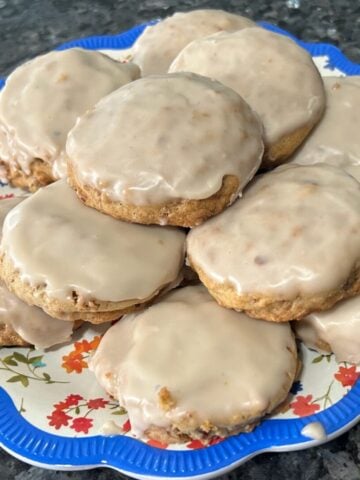
Make cookies to go along with it! I have a fun cut-out sugar cookie recipe and I’ve made gorgeous soft blue sugar cookies at Christmas time.
Fun Ideas for these Cupcakes:
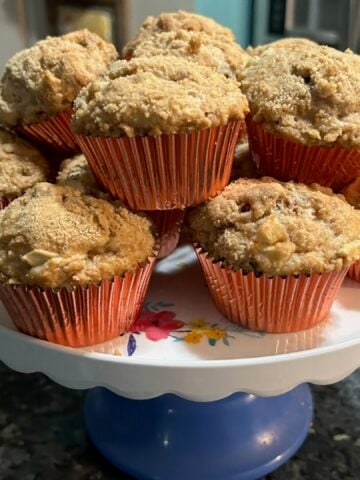
Surprise the kids on Christmas morning with this giant snowflake. Only, make it out of my cinnamon-sugar muffin mix. (Delicious!)
Outline the snowflake by adding a white stripe of buttercream down each arm (in much the same way I did in these cookies).

Other Christmas Desserts
Here at Out of the Box we have a plethora of Christmas offerings. Here are just a few.
- Orange Cranberry Cookies
- Holiday Peppermint Bark
- Festive Fruitcake
- White Chocolate Candy Cane Cookies
- Christmas Spice Cake:
- Holiday Sugar Cookies
That’s it for this post, friends! I hope you enjoyed this delicious recipe.
If you make this recipe and love it, don’t forget to leave a review and a comment below. And while you're at it, go ahead and pin some photos to your Pinterest boards!
Learn more about doctored cake mixes, the theme of this blog.
For the master list of all doctored cake mix recipes on this site, visit Doctored Cake Mix Recipes, Master List.
About the Author
Janice Thompson is an author, baker, and all-around mischief maker! She has overcome a host of baking catastrophes, including a toppled wedding cake, to learn more about the baking process. Janice has published over 150 books for the Christian market but particularly enjoys writing recipes and baking devotions. To learn more about Janice or to drop her a note, visit her About the Author page.

Pull Apart Snowflake Cupcakes
If you’re looking for a quick treat for an upcoming Christmas party, this is the post for you. I’m going to show you how I made this simple pull-apart cupcake snowflake.
Ingredients
- Orange Creamsicle Cupcake Ingredients
- FOR THE CUPCAKES
- 2 boxes yellow cake mix
- 2 cups whole milk
- 1 cup vegetable oil
- 6 eggs
- 1 box orange jello
- FOR THE FROSTING
- 1 block (1 cup) room temperature cream cheese
- 1 cup room temperature butter
- 1 cup Crisco
- 1 bag (2 pounds) powdered sugar
- 1 teaspoon vanilla extract (or orange extract)
- Milk to thin (if necessary)
- Sprinkles
- Fondant for snowflakes (optional)
- Blue coloring gel to color half of the frosting
Instructions
- How to Make Creamsicle Cupcakes
Preheat oven to 350 degree Fahrenheit.
I usually mix the eggs first with the oil but in this case I (literally) just dumped everything into the mixing bowl and and mixed it up.
I used the bowl of my stand mixer (with paddle attachment) but you could even mix this by hand with a whisk or wooden spoon. It’s an easy recipe.
Two boxes of mix will make about 30 - 32 cupcakes, so put that many liners in your cupcake tins.
Use an ice cream scoop to scoop out the batter.
Bake cupcakes for 16 minutes at 350. They should spring back to the touch.
Set aside to cool.
How to Make Dreamy Buttercream
Place cream cheese in mixer and beat until creamy.
Add butter and continue to mix until they come together and are light and fluffy in appearance.
Now it’s time to add the Crisco. (I don’t recommend the buttery-version, as it will change the color. You want a bright white.) Mix well until the whole thing looks light and dreamy.
Add the powdered sugar, a couple of cups at a time. Mix well.
If it’s too thick, thin it out a bit with milk. - How to Color Your Frosting
Place half of the frosting in a separate bowl and add a couple of drops of blue coloring gel. Stir well until the color is a shade you like.
You’ll need multiple piping bags.
I had enough frosting to fill three with white and three with blue.
Now comes the fun part. Put a Wilton 1M tip into a large empty piping bag.
Add one bag of white frosting and one bag of blue, side-by-side.
Do a practice squirt until you see both colors coming out at once.
Now it’s time to swirl your cupcakes!
It’s so much fun to swirl on the dual-colored frosting.
Start in the middle and go around, working your way out to the outer edge.
Make sure you color 25 cupcakes, because that’s the number you’ll need. - How to Decorate Your Cupcakes
I decided to add fondant snowflakes. I have a handy-dandy little fondant plunger that makes lovely snowflakes. If you don’t have that, just add pearls, sprinkles, or sanding sugar. The choices are endless!
Notes
Let’s Put our Snowflake Together!
I’ve drawn a diagram so you can see how I made mine.
Start with one cupcake in the center and five around it.
Each of the five gets an additional one. (We’ll call these arms.)
Each arm gets two “hands.”
You’ll see a total of 21 cupcake here.
If you’re feeding a larger crowd, no worries! Just squeeze in six cupcakes around the center one and do a total of six arms (twelve hands) for a fuller snowflake.
No matter how big you make it, this is a darling idea! And I’ll also share that this project takes up too much space to fit on a traditional cake board, which is why I set mine up directly on my island. You could put a pretty tablecloth underneath it if you like.
Unlike other pull-apart cupcake projects, this one isn’t really stuck together. In other words, it’s not messy. It’s simple and fun and the creamsicle cupcakes are super tasty.
Beautiful cupcakes!! Thanks for sharing at the What's for Dinner party! Have a fabulous week.
You always make everything look so pretty! Thanks for sharing at the What's for Dinner party! See you Sunday!
@Helen at the Lazy Gastronome, oops - I commented twice! Oh well - they are certainly worth it!