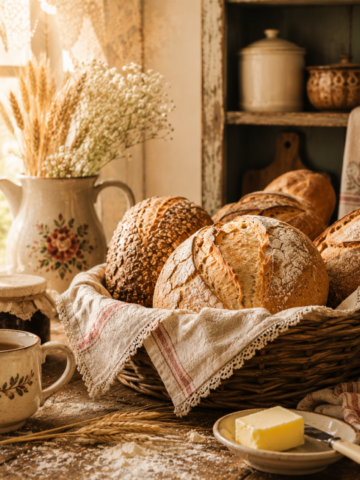
Jalapeno Cheddar Sourdough

This bold and flavorful jalapeño cheddar sourdough bread is the perfect blend of spicy heat and melty cheese. Made with sourdough starter and a hint of yeast, it's soft on the inside with a golden, cheesy crust—ideal for sandwiches, toast, or snacking.

Let's Bake Some Bread, Friends!
If you love bold flavors baked into comforting bread, this Jalapeño Cheddar Sourdough is going to be your new favorite loaf. Sharp cheddar melts into pockets of savory goodness while jalapeños bring just the right kick of heat.
The result? A soft, chewy interior and a golden, cheesy crust that’s perfect for sandwiches, grilled cheese upgrades, or enjoying plain with butter.
Whether you’re baking for a spicy food lover or just want to try something new with your sourdough starter, this loaf delivers both warmth and character in every slice.
Jalapeño and Cheddar: the Perfect Pairing
Jalapeños and cheddar cheese make a bold, flavorful combination. The spicy kick of the peppers is a beautiful complement to the creamy richness of the cheddar. When you put these two together you create the ideal balance of heat and flavor in every bite.
That’s especially true in this sourdough recipe! The cheese melts into the dough, forming pockets of salty goodness. And the jalapeños? Well, they provide just enough zing to keep things exciting. In short, this is a match made in heaven!
How to Serve Jalapeño Cheddar Sourdough
I don’t know about you, but I love the idea of eating this bread as a side with any of the following:
Chili: Talk about the perfect pairing!
Tomato soup: Yes, please! Serve this warm sourdough with your tomato soup and watch your guests swoon!
Beef stew: I mean. . .c’mon. A spicy bread with your beef stew? Yum!
Grilled cheese sandwiches: Use this bread in your grilled cheese and take it over the top!
There are so many ways you can serve it up. And I promise, you’ll love it, no matter how or when you serve it.
So, what are we waiting for? Let's bake some bread!
Jalapeno Caesar Sourdough Ingredients:

You will find a full printable recipe card at the bottom of this post but here’s a quick peek at some of the inclusions you'll need to make this bread. These are simple ingredients you might already have on hand in your pantry or refrigerator.
- 100 grams active starter (½ cup)
- 350 grams water (1 ½ cups)
- 500 grams all-purpose or bread flour (4 cups, loosely scooped and leveled)
- 10 grams salt (1 ¾ teaspoons)
- 6 ounces cheddar, finely chopped into squares (1 ½ cups)
- 1 ½ jalapeños, (only use half of the seeds), finely chopped and floured (about a tablespoon of flour)
Disclaimer: This recipe was originally developed using weight measurements for accuracy. Flour can vary greatly depending on how it's scooped (packed vs. loose), and sourdough starter densities can differ. For best results, use a digital kitchen scale. Cup conversions are provided for convenience but may affect texture and hydration.
Along with these ingredients the following supplies will come in handy:
- Kitchen scale
- Danish dough whisk
- A bowl scraper
- Banneton proofing basket
- Bread Lame (scoring tool)
- Dutch oven
- Parchment paper sheet
How to Make Jalapeno Cheddar Sourdough Bread
Like most of my sourdough recipes, this is a two-day process. If you prefer, you can use my same-day sourdough recipe, but the traditional way is best, so that’s the one I’ll share here. Follow these timed instruction for the best outcome.
DAY ONE:
8:00 AM
Start the day by feeding your starter using the 1:1:1 method (equal portions starter, room temperature water, and flour).
Example: 200 grams of starter, 200 grams of water, 200 grams of flour
Let the starter sit for 4-5 hours until it doubles in size and turns bubbly.

You can go ahead and prep your cheese and jalapeños while the starter is rising.
Cut the cheese into small squares. (I used a block of cheese and made squares about the size of peas. You can make them slightly larger, if you prefer.)
Now, for the jalapeños: You can use as many or as few as you like. I’m not crazy about too much spice so I used 1 ½ and removed about half of the seeds. I used kitchen gloves to chop my jalapeños into tiny pieces. Place them in a small bowl with a tablespoon of flour, then toss to gently coat them.


12:00 PM
Check your starter to make sure it’s ready to go. Drop a pinch in some water to make sure it passes the float test.

Make sure your ingredients are ready to go.

Measure 350 grams of room temperature water into your mixing bowl.
Add 100 grams of the activated starter and whisk well using the Danish Bread Whisk or spoon.
Add 500 grams of flour and 10 grams of salt.
Continue to use the bread whisk to create a shaggy, sticky dough.

If you like, you can take over this process with your hands to get rid of all the lumps, but I choose to use a bowl scraper, puling the excess dough away from the sides of the bowl and toward the center, turning the bowl as I go.
Cover with a tea towel or cheesecloth and set aside for an hour.
1:00 PM

It’s time to do your first round of stretch and folds. This is a simple and satisfying process. Wet your hands, reach down into the bowl and stretch the dough up as far as you can, and fold it over to center. Rotate the bowl a quarter turn and repeat. Keep turning until you’ve stretched and folded all of the dough.
Loosely cover and allow to sit for half an hour.
1:30 PM

Perform your second stretch and folds. This is a good time to add your cheese and jalapeno because the dough is still pliable. As you stretch and fold, you can incorporate both the peppers and the cheese together. Make sure it’s mixed well.
2:00 PM
Perform your third set of stretch and folds.
2:30 PM
Perform your fourth and final stretch and folds.
Cover dough and leave it proof at room temperature for 4-5 hours. You don’t want to go any longer than that.

7:00 PM
Now that the dough has proofed it’s time to shape it into a loaf. There are a variety of methods but these days I usually use the envelop method, as you see in the photo below, using a lightly floured surface. Basically, I stretch it into a rectangle, then fold the right side in, then fold the left side over it. Then I roll up the dough and do a few push and pulls to shape it into a circle. This ball of dough is known as a "boule."

7:15 PM
Place a tea towel or cheesecloth in your Banneton bowl. Flip the shaped loaf and set it inside, seam side up. Cover with tea towel or cheesecloth and place in refrigerator.

DAY TWO:
8:00 AM
Place an empty dutch oven (with lid) in the oven and set temperature at 450 degrees Fahrenheit. Leave the pan in the oven for a full hour to get piping hot.
9:00 AM
Remove banneton from refrigerator. Don't fret if it looks a bit flat. Hopefully you'll get a lovely "open spring" during the first 20 minutes of being.
Crumple a piece of parchment paper and place it on top of the banneton.
Flip the dough ball out onto the wrinkled paper.
Use the lame (or a razor or sharp paring knife) to score the dough. A slight curve is all that’s necessary but you can get fancy if you like. Cut down about half an inch so that the dough has plenty of room to expand as it bakes.

Using a hot pad remove the lid from the dutch oven. Be extra careful not to burn yourself.
Use the parchment paper to gently maneuver the loaf into the hot pan. (Be careful!)

Drop four ice cubes into the dutch oven under the edges of the parchment paper. This will create the steam you need for the bread to bake properly.
Put the lid back on and close the oven door.
Set your timer for 20 minutes.
After 20 minutes remove the lid and check your oven spring. (Hopefully it has risen quite a bit!)
Bake for another 20 minutes.
Your bread is now ready!
Remove the dutch oven from the oven and place it on a wire rack to cool.
After a few minutes, remove the loaf (and parchment paper) from the dutch oven.
Allow to cool for at least an hour, or even longer. If you cut the loaf while it’s warm you run the risk of making it gummy.

Slice, serve and enjoy!

Store at room temperature in a bread bag or a basket with tea towel on top. This bread will stay fresh for 4-5 days. I put mine in the refrigerator after slicing to give it more time.
What to Expect from this Jalapeno Cheddar Loaf

This sourdough loaf is everything you love about homemade bread—crusty on the outside, soft and chewy on the inside—with a flavorful twist. Sharp cheddar melts into the dough, creating rich, savory pockets, while the jalapeños add just the right amount of heat.

The combination is bold but incredibly balanced, which makes each slice irresistible. Whether you enjoy it fresh from the oven, toasted with butter, or piled high with sandwich fixings, this loaf delivers a spicy-cheesy punch in every bite. I’m convinced you will love it!
Variations to this Recipe
Bacon Bits: Add cooked, chopped bacon for a jalapeño popper-inspired loaf.
Change up the cheese. Try Smoked Gouda or Pepper Jack for a smokier or spicier twist.
Parmesan is a great choice! You can sprinkle it on top for a salty “bite.” (Hey, go ahead and add some pepperoni to this one, if you like!)
Other Sourdough Breads from Out of the Box Baking
If you love this recipe you’ll flip over some of my other sourdoughs. Here are some fan favorites:
- Original Homemade Sourdough Bread
- Same-Day Sourdough Bread
- Sourdough Dinner Rolls
- Sourdough Discard Focaccia
That’s it for this post, friends!
I hope you enjoyed this delicious recipe.
If you make this recipe and love it, don’t forget to leave a review and a comment below. And while you're at it, go ahead and pin some photos to your Pinterest boards!


Loved this recipe? Get more like it straight to your inbox. Sign up for our newsletter now!
Simple homemade bakes like this are beloved across many countries. You might enjoy browsing these international favorites.
About the Author
Janice Thompson is an author, baker, and all-around mischief maker! She has overcome a host of baking catastrophes, including a toppled wedding cake, to learn more about the baking process. Janice has published over 165 books for the Christian market but particularly enjoys writing recipes and baking devotions. To learn more about Janice or to drop her a note, visit her About the Author page.
Overnight sourdough recipe

Jalapeño Cheddar Sourdough Bread
This bold and flavorful jalapeño cheddar sourdough bread is the perfect blend of spicy heat and melty cheese. Made with sourdough starter and a hint of yeast, it's soft on the inside with a golden, cheesy crust—ideal for sandwiches, toast, or snacking.
Ingredients
- 100 grams active starter (½ cup)
- 350 grams water (1 ½ cups)
- 500 grams all-purpose or bread flour (4 cups, loosely scooped and leveled)
- 10 grams salt (1 ¾ teaspoons)
- 6 ounces cheddar, finely chopped into squares (1 ½ cups)
- 1 ½ jalapeños, (only use half of the seeds), finely chopped and floured (about a tablespoon of flour)
Instructions
DAY ONE:
8:00 AM
Start the day by feeding your starter using the 1:1:1 method (equal portions starter, room temperature water, and flour).
Example: 200 grams of starter, 200 grams of water, 200 grams of flour
Let the starter sit for 4-5 hours until it doubles in size and turns bubbly.
You can go ahead and prep your cheese and jalapeños while the starter is rising.
Cut the cheese into small squares. (I used a block of cheese and made squares about the size of peas. You can make them slightly larger, if you prefer.)
Now, for the jalapeños: You can use as many or as few as you like. I’m not crazy about too much spice so I used 1 ½ and removed about half of the seeds. I used kitchen gloves to chop my jalapeños into tiny pieces. Place them in a small bowl with a tablespoon of flour, then toss to gently coat them.
12:00 PM
Check your starter to make sure it’s ready to go. Drop a pinch in some water to make sure it passes the float test.
Measure 350 grams of room temperature water into your mixing bowl.
Add 100 grams of the activated starter and whisk well using the Danish Bread Whisk or spoon.
Add 500 grams of flour and 10 grams of salt.
Continue to use the bread whisk to create a shaggy, sticky dough.
If you like, you can take over this process with your hands to get rid of all the lumps, but I choose to use a bowl scraper, puling the excess dough away from the sides of the bowl and toward the center, turning the bowl as I go.
Cover with a tea towel or cheesecloth and set aside for an hour.
1:00 PM
It’s time to do your first round of stretch and folds. This is a simple and satisfying process. Wet your hands, reach down into the bowl and stretch the dough up as far as you can, and fold it over to center. Rotate the bowl a quarter turn and repeat. Keep turning until you’ve stretched and folded all of the dough.
Loosely cover and allow to sit for half an hour.
1:30 PM
Perform your second stretch and folds. This is a good time to add your cheese and jalapeno because the dough is still pliable. As you stretch and fold, you can incorporate both the peppers and the cheese together. Make sure it’s mixed well.
2:00 PM
Perform your third set of stretch and folds.
2:30 PM
Perform your fourth and final stretch and folds.
Cover dough and leave it proof at room temperature for 4-5 hours. You don’t want to go any longer than that.
7:00 PM
Now that the dough has proofed it’s time to shape it into a loaf. There are a variety of methods but these days I usually use the envelop method, as you see in the photo below, using a lightly floured surface. Basically, I stretch it into a rectangle, then fold the right side in, then fold the left side over it. Then I roll up the dough and shape it into a circle, seam side down.
7:15 PM
Place a tea towel or cheesecloth in your Banneton bowl. Flip the shaped loaf and set it inside, seam side up. Cover with tea towel or cheesecloth and place in refrigerator.
DAY TWO:
8:00 AM
Place an empty dutch oven (with lid) in the oven and set temperature at 450 degrees Fahrenheit. Leave the pan in the oven for a full hour to get piping hot.
9:00 AM
Remove banneton from refrigerator.
Crumple a piece of parchment paper and place it on top of the banneton.
Flip the dough ball out onto the wrinkled paper.
Use the lame (or a razor or sharp paring knife) to score the dough. A slight curve is all that’s necessary but you can get fancy if you like. Cut down about half an inch so that the dough has plenty of room to expand as it bakes.
Using a hot pad remove the lid from the dutch oven. Be extra careful not to burn yourself.
Use the parchment paper to gently maneuver the loaf into the hot pan. (Be careful!)
Drop four ice cubes into the dutch oven under the edges of the parchment paper. This will create the steam you need for the bread to bake properly.
Put the lid back on and close the oven door.
Set your timer for 20 minutes.
After 20 minutes remove the lid and bake for another 20 minutes.
Your bread is now ready!
Remove the dutch oven from the oven and place it on a wire rack to cool.
After a few minutes, remove the loaf (and parchment paper) from the dutch oven.
Allow to cool for at least an hour, or even longer. If you cut the loaf while it’s warm you run the risk of making it gummy.
Slice, serve and enjoy!
Store at room temperature in a bread bag or a basket with tea towel on top. This bread will stay fresh for 4-5 days. I put mine in the refrigerator after slicing to give it more time.
Notes
Disclaimer: This recipe was originally developed using weight measurements for accuracy. Flour can vary greatly depending on how it's scooped (packed vs. loose), and sourdough starter densities can differ. For best results, use a digital kitchen scale. Cup conversions are provided for convenience but may affect texture and hydration.
Nutrition Information:
Yield: 15 Serving Size: 1Amount Per Serving: Calories: 209Total Fat: 5gSaturated Fat: 3gTrans Fat: 0gUnsaturated Fat: 2gCholesterol: 14mgSodium: 418mgCarbohydrates: 32gFiber: 1gSugar: 0gProtein: 8g
The nutrition information is a product of online calculators. I try to provide true and accurate information, but these numbers are estimates.
Peace I leave with you; my peace I give to you. Not as the world gives do I give to you. Let not your hearts be troubled, neither let them be afraid.
John 14:27 ESV