
World’s Easiest Sourdough Starter
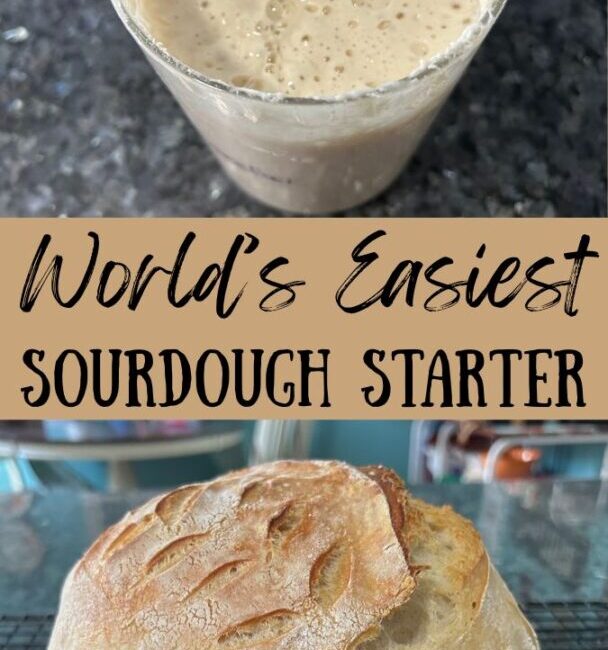
If you’re ready to tackle sourdough but you don’t have starter, this is the recipe for you. In this post I’m going to share my oh-so-simple starter, so easy that anyone can do it!

At a Glance: World’s Easiest Sourdough Starter
👩🍳 Skill Level: Beginner
🥄 Flavor Profile: Slightly tangy, with a clean fermented aroma and mild sour flavor
🎯 Best For: First-time sourdough bakers or anyone looking for a low-maintenance starter
Is Sourdough Baking Hard?
I’ll be honest: I tried my hand at sourdough bread baking about a year ago and failed miserably. I can make bread. I’ve got a ton of other bread recipes. What I couldn’t seem to conquer was the whole “starter” thing.
Before I delve too deep into that story, let me start by explaining what “starter” is, in case you have questions. (I did!) The reality is: you can’t make sourdough bread without starter. It’s the most essential ingredient of all. But, if you’re like most people, you don’t happen to have starter in your kitchen. And even if you did, you might not know what to do with it.
What is Sourdough Starter?

A sourdough starter is a live, fermented mixture of flour and water that captures wild yeast and beneficial bacteria from the environment. Yep, you read that right. It’s just flour and water that has been “activated” by natural yeast in the air.
Now, if you’re like me, you read that and say. . .gross! But the reality is, these microscopic organisms feed on sugars and starches (like the flour) and then produce carbon dioxide and alcohol as byproducts—a process known as fermentation.
The Point of Fermentation?
To help the bread rise without the need for commercial yeast. There’s a second reason, too. Sourdough receives its signature tangy flavor and chewy texture from the fermentation process. Over time, as the starter ferments, it develops complex layers of flavor while also making the bread easier to digest.

Sounds good, right? The only problem is, starter requires tending, and lots of it. I told some friends that caring for starter is a bit like caring for a newborn baby—it requires time, work, and patience. It can also be a little messy!
A healthy starter requires regular feeding with fresh flour and water to stay active and bubbly. Once established, it can be used to bake delicious homemade sourdough bread for years to come!
So, How Do I Make Starter?
I tried once before to make my own starter but didn’t understand the process. So, I tucked the idea away and decided “Sourdough’s just not for me.” Then a friend gave me some of her starter (lovingly named Ethel).

Ethel worked so beautifully, produced such lovely breads, that I decided she needed a cousin, one I would name Lorelai.
But, how to go about it. This was the question. I needed to figure out how to make my own starter. . .from scratch. (How could I even call myself a baker if I didn’t conquer this one simple task?)
And friends, it turns out it really is simple. It’s just a process. And in this post I plan to share my simplified, scaled-back approach. This method starts small. Very small. In fact, you’ll be working with such small quantities that you won’t even need to discard any of the starter until you’re several days into the process.
But, I’m getting ahead of myself. Let’s break this down, starting with ingredients.
Sourdough Starter Ingredients

- 2-pound bag organic unbleached flour (all purpose flour is fine, though you’re welcome to start with any flour you like)
- 32 ounces filtered water (non-chlorinated)
Supplies:
- A tall, straight-edged glass jar
- Cloth cover (or loose top) for the top of the jar
- Kitchen scale (to weigh ingredients)
- Narrow silicone spatula for stirring
That’s it! Just a few simple things!
Before we Begin: Let’s Talk Temperature
For the best outcome with the fermentation process, your kitchen should be between 70°F and 75°F. This temperature range encourages the wild yeast and bacteria to thrive, and promotes steady fermentation without being too slow or too fast.
If your room is too cool, the fermentation slows down: your starter may take longer to bubble and develop.
If the room is too warm, the fermentation speeds up: This leads to overly acidic flavors or an imbalance in yeast and bacteria.
If you prefer to keep your house cold, just set the starter in a spot that’s slightly warmer—like inside the oven with the light on (but no heat, obviously).
How to Make Sourdough Starter from Scratch
Okay, let’s get going! Make sure your glass jar is completely clean and ready to go. Keep all of your ingredients and supplies together for the duration of this process and things will go smoothly. Make sure you set a daily timer on your phone so you don't forget to feed your starter!
Day One:
- Measure 50 grams of flour and 50 grams of water into the glass jar. Stir well with the narrow spatula. Cover with cloth or loose top.
Day Two:
- Add one tablespoon of flour and one tablespoon of water. Mix well. Cover.
Day Three:
- Add one tablespoon of flour and one tablespoon of water. Mix well. Cover.
Day Four:
- Morning: Add one tablespoon of flour and one tablespoon of water. Mix well. Cover.
- Evening: Add one tablespoon of flour and one tablespoon of water. Mix well. Cover.
Day Five:
- Morning: Add one tablespoon of flour and one tablespoon of water. Mix well. Cover.
- Evening: Add one tablespoon of flour and one tablespoon of water. Mix well. Cover.
Day Six:
- Morning: Add one tablespoon of flour and one tablespoon of water. Mix well. Cover.
- Evening: Add one tablespoon of flour and one tablespoon of water. Mix well. Cover.
Day Seven:
- Morning: Add one tablespoon of flour and one tablespoon of water. Mix well. Cover.
- Evening: Add one tablespoon of flour and one tablespoon of water. Mix well. Cover.
Day Eight:
- Morning: Add one tablespoon of flour and one tablespoon of water. Mix well. Cover.
- Evening: Add one tablespoon of flour and one tablespoon of water. Mix well. Cover.
Day Nine:
- Morning: Add one tablespoon of flour and one tablespoon of water. Mix well. Cover.
- Evening: Add one tablespoon of flour and one tablespoon of water. Mix well. Cover.
Day Ten:
- Morning: Add one tablespoon of flour and one tablespoon of water. Mix well. Cover.
- Evening: Add one tablespoon of flour and one tablespoon of water. Mix well. Cover.
What to Expect During the First 10 Days
This is a simple timeline you might appreciate:
✔ Day 1-2: Little to no activity, maybe a few bubbles


✔ Day 3-4: At this point the starter might start to smell funky (like smelly gym socks or vinegar). Not to worry. This is totally normal!


✔ Day 5-7: More bubbles, should start rising and falling as you start double-feeding it. It’s fun to put a rubber band around the jar to watch the rise and fall of the starter. If you started with a small jar you might need to transfer it to a larger one at this point. This is also the point where you might need to discard some of the top bits if they congeal or turn dark.

✔ Day 8-10: The starter should be strong enough to pass the float test at this point.

How to Feed Your Starter
When you’re ready to use your starter for the first time, you’ll want to discard some of it and then give it a proper feed. Here are things to know:
Discard all but 200 grams of the starter. Feed with 200 grams of water (stirring well with the starter) and 200 grams of flour.


Stir well, place in microwave next to a glass of hot water, and allow to ferment for four - six hours. At this point your starter should be very bubbly and doubled in size.


You will know when your starter is ready when it floats in water. Drop a small spoonful into water and see what happens. If it passes the float test, you’re ready to go.

Other signs that your starter is ready to go:
✔ It doubles in size within 4-6 hours after feeding (for best results, make sure it doubles!)
✔ It has a pleasant, slightly tangy smell (not overly sour or yeasty)
✔ The texture becomes light and airy with visible bubbles throughout
Let's Start Baking!
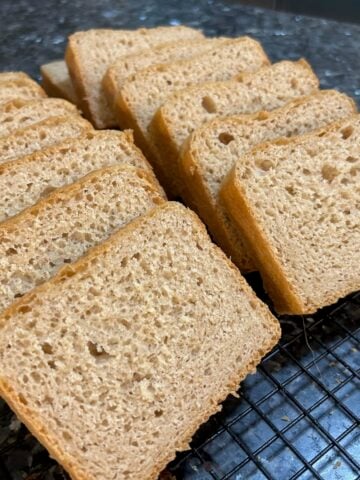
You can now use your “active” starter to make recipes like my Most Delicious Sourdough Bread, a recipe I got from my sweet friend Dianie. (She’s the sourdough pro!) You can also use it in my Quick Sourdough Dinner Rolls or my Focaccia recipe. You can even use it in my Sourdough Pizza dough.

You can use any discarded “inactive” starter in recipes like my Starter Discard Banana Bread or my Flaky Sourdough Biscuits. There are also lots of great discard recipes online for pancakes, crackers, waffles, and even muffins.
How to Discard and Care for Your Starter
“Discarding” starter is a natural part of this process, but don’t toss that discard! As I mentioned above, it’s great for adding to many recipes—everything from cookies to biscuits to quick breads. Here’s more about the process of discarding and feeding your starter:
- Remove & Discard: Before feeding your starter, scoop out and discard about half of your starter (or more if it’s very large).
- Feed the Remaining Starter: Add fresh flour and water (usually equal parts by weight) to the remaining starter and mix well. (We call this the 1:1:1 method. If you have 100 grams of starter you will add 100 grams of flour and 100 grams of water.)
- Repeat Regularly: Continue this process daily if kept at room temperature or weekly if refrigerated. Don't forget to discard before feeding.
When Do I Need to Refrigerate my Starter?

You should refrigerate your sourdough starter if you don’t plan to use or feed it daily. This slows down fermentation and reduces the need for frequent feedings.
Here are some examples of when to refrigerate it:
- If you bake less than 3-4 times a week: Refrigerate your starter to avoid daily maintenance.
- If you’re going on vacation or taking a break: Storing it in the fridge lets it stay dormant for weeks with minimal care.
How to Refrigerate Your Starter
- Feed it first – Give your starter a fresh feeding of flour and water.
- Let it sit at room temperature for 1-2 hours – This allows fermentation to begin. Active sourdough starter is best for refrigeration.
- Store in the fridge – Keep it in a loosely covered jar or container.
How to Use It Again
- Remove it from the fridge the day before baking.
- Once it reaches room temperature feed it (1:1:1) and let it sit for four hours.
A healthy starter can survive in the fridge for weeks but should be fed at least once every 7–10 days to stay strong!
Questions People are Asking about this Sourdough Starter Recipe:

Oops! I forgot to feed my starter. Now what?
Don’t panic! A neglected starter will need a few feedings to revive, but it’s usually possible.
Can I use whole wheat flour, bread flour, or rye flour for my starter?
Yes! Whole wheat and rye flour work great because they contain more natural wild yeast, often making the starter more active. Some people start with rye and then discard, adding all-purpose once the starter is hungry. (This is the beauty of starters: you can feed it with pretty much any kind of flour you like!)
I’m pretty sure my starter is dead. How do I know for sure?
Starter is very resilient. It’s probably not dead; it just needs to be fed and reactivated. Leave it at room temperature, feeding once or twice a day. If no bubbles form by the second or third day, you can revive it this way: discard most of it, (leaving just a tablespoon or so). Feed with fresh flour and water (equal parts by weight). Keep in a warm place and feed daily. Keep repeating until you eventually see bubbles.
Why is my sourdough bread gummy?
Your starter might be to blame. If it’s weak (not bubbly or mature enough) you’ll end up with a dense loaf. Under-proofing your dough can also lead to a dense/gummy outcome. You might also check your recipe. Too much flour will create a tough loaf.
Do you have a good sourdough bread recipe?


I do! I got this from my friend Dianie, who gave me permission to share.
- 100 grams starter
- 350 grams water
- 500 grams flour
- 10 grams salt
For more on how to make and bake this loaf, visit my Sourdough Bread recipe post. I just love that golden brown crust!
I’m going out of town for a couple of weeks. Can I freeze my starter?
Yes, you can freeze your sourdough starter if you need to store it long-term without regular feedings. Freezing puts the yeast and bacteria into a dormant state, allowing you to revive it later when you're ready to bake again. Feed it, portion it in smaller containers with sealed top, then only thaw what you need when you’re ready to re-activate.
Can I preserve my starter for later use?
You might consider dehydrating your starter. This is a great way to preserve it long-term. You can skip the regular feedings. To dehydrate: feed the starter and let it bubble up. Spread thinly on parchment paper (about ⅛ inch thick) with a spatula. Air dry for 12 - 24 hours or use low heat (100 degrees Fahrenheit) with the oven door slightly open for airflow. Once it’s dehydrated, break into pieces or grind into a powder using your food processor. Store in an airtight container with a sealed top When you’re ready, rehydrate it by combining 1 tablespoon of dried starter with 2 tablespoons of water. After sitting for an hour you can feed with the 1:1:1 method. Keep feeding daily until it bubbles again.
Should I cover my starter airtight or loose?

Ah, the age old question! You will want to use a loose lid or cloth cover for one simple purpose: This allows airflow and it also prevents pressure buildup. If you're refrigerating or not planning to feed it, it's okay to add an airtight lid.
Why does my starter smell like alcohol or vinegar?
This odd smell happens when your starter is hungry. (Feed me!) The strong smell comes from the natural fermentation process. What do you do about it? Just give the starter a fresh feeding to balance it out.
What is the liquid on top of my starter?
That’s hooch, a naturally occurring liquid that forms when the starter is starving. You can stir it back in for a stronger sour flavor or pour it off before feeding.
I want to share starter with a friend. How do I do that?
- If your friend is baking right away, give her half a cup of active/fed starter.
- If she’s not baking for a while, give her half a cup of refrigerated (inactive) starter and let her know that she should refrigerate until one day before use, at which point she will feed it with the 1:1:1 method.
Can I Mix Starters?
Maybe you have half a cup of an old starter your great aunt Susie gave you and a fresh new starter you just created. Should you merge them? The short answer: "It’s possible, but not necessarily recommended." Why? Because the yeast and bacteria will compete with each other. You certainly don’t want to merge starters that are unhealthy. And you want to make sure the consistencies are the same. For sure, you’ll want to keep back a portion of each, just in case something goes wrong.
What if my Starter Gets Overheated?
This happened to me recently. I inadvertently left the jar of freshly fed starter on top of the stove while I was preheating for a bake. It sat there (at about 100 degrees) for a full hour before I discovered it. I figured it was a goner, but did some research and decided to let it come to room temp, pour the center section (about a quarter cup) into a fresh jar. I fed it at 1:2:2 and left it alone to see what would happen. It revived just fine. My research showed me that you should discard overheated starter if it smells rancid, or looks pink, orange, or gray. You also want to discard any sections that are congealed. The core usually survives even if the edges overheat. Whew! (Talk about cutting it close!) Thankfully, I had freshly fed discard in the fridge, so I pulled that out and let it come to room temp, then fed it too, so I could compare the two.
What is Sourdough Levain and How is It Different from Starter?
Basically, a levain (pronounced luh-van) is just what you mix up for that day's project, with your primary jar of starter still sitting on the counter or in the fridge. A levain is made with the 1:1:1 method. You'll notice from my instructions above that I used my whole starter (minus the discard) to create my first levain, but I had plenty more starter in the fridge, just in case I ran out.
That’s it for this post, friends! I hope you enjoyed this delicious recipe.
I thought it would be fun to leave you with a scripture:
A little leaven leavens the whole lump. (Galatians 5:9 NKJV)
It doesn't take much leaven to change everything, my friends!
If you make this sourdough starter and it works out for you, don’t forget to leave a review and a comment below. And while you're at it, go ahead and pin some photos to your Pinterest boards!


Loved this recipe? Get more like it straight to your inbox. Sign up for our newsletter now!
P.S. I'm so proud that I've finally made my own sourdough starter! I'm making progress on my sourdough journey!
About the Author
Janice Thompson is an author, baker, and all-around mischief maker! She has overcome a host of baking catastrophes, including a toppled wedding cake, to learn more about the baking process. Janice has published over 165 books for the Christian market but particularly enjoys writing recipes and baking devotions. To learn more about Janice or to drop her a note, visit her About the Author page.

World's Easiest Sourdough Starter
If you’re ready to tackle sourdough but you don’t have starter, this is the recipe for you. In this post I’m going to share my oh-so-simple starter, so easy that anyone can do it!
Ingredients
- 1 small bag organic unbleached flour (all purpose is fine, though you’re welcome to start with any flour you like)
- 32 ounces filtered (non-chlorinated) water
Instructions
Day One: Measure 50 grams of flour and 50 grams of water into the glass jar. Stir well with the narrow spatula. Cover with cloth or loose top.
Day Two: Add one tablespoon of flour and one tablespoon of water. Mix well. Cover.
Day Three: Add one tablespoon of flour and one tablespoon of water. Mix well. Cover.
Day Four: Morning: Add one tablespoon of flour and one tablespoon of water. Mix well. Cover. Evening: Add one tablespoon of flour and one tablespoon of water. Mix well. Cover.
Day Five: Morning: Add one tablespoon of flour and one tablespoon of water. Mix well. Cover. Evening: Add one tablespoon of flour and one tablespoon of water. Mix well. Cover.
Day Six: Morning: Add one tablespoon of flour and one tablespoon of water. Mix well. Cover. Evening: Add one tablespoon of flour and one tablespoon of water. Mix well. Cover.
Day Seven: Morning: Add one tablespoon of flour and one tablespoon of water. Mix well. Cover. Evening: Add one tablespoon of flour and one tablespoon of water. Mix well. Cover.
Day Eight: Morning: Add one tablespoon of flour and one tablespoon of water. Mix well. Cover. Evening: Add one tablespoon of flour and one tablespoon of water. Mix well. Cover.
Day Nine: Morning: Add one tablespoon of flour and one tablespoon of water. Mix well. Cover. Evening: Add one tablespoon of flour and one tablespoon of water. Mix well. Cover.
Day Ten: Morning: Add one tablespoon of flour and one tablespoon of water. Mix well. Cover. Evening: Add one tablespoon of flour and one tablespoon of water. Mix well. Cover.
When you’re ready to use your starter for the first time, you’ll want to discard some of it and then give it a proper feed. Here are things to know:
Discard all but 200 grams of the starter. Feed with 200 grams of water (stirring well with the starter) and 200 grams of flour. Stir well, place in microwave next to a glass of hot water, and allow to ferment for four hours. At this point your starter should be very bubbly and doubled in size.
You will know when your starter is ready when it floats in water. Drop a small spoonful into water on day 10 and see what happens. If it’s starting to smell sour and floats, you’re ready to go.
Other signs that your starter is ready to go:
✔ It doubles in size within 4-6 hours after feeding
✔ It has a pleasant, slightly tangy smell (not overly sour or yeasty)
✔ The texture becomes light and airy with visible bubbles throughout
May the God of hope fill you with all joy and peace in believing, so that by the power of the Holy Spirit you may abound in hope.
Romans 15:13 ESV


Your Sourdough Starter is featured on Full Plate Thursday, 739. Thanks so much for sharing with us and we hope you will come back to see us real soon!
Miz Helen