
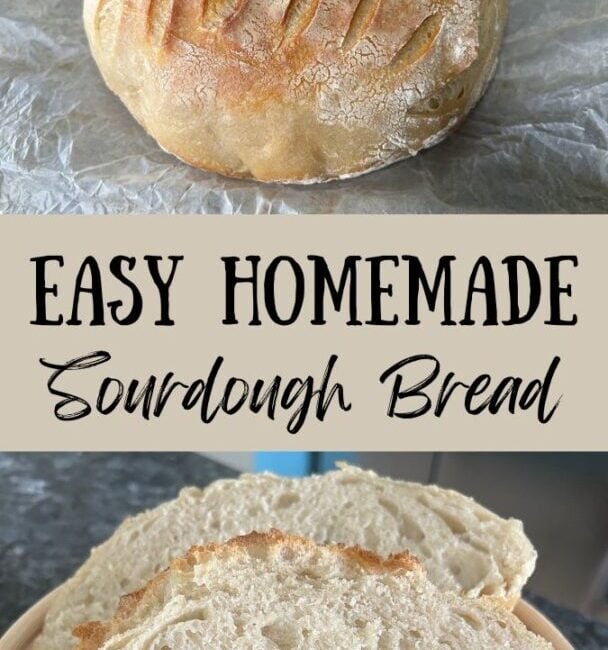
Easy Homemade Sourdough Bread (No-Fail Recipe!)
If you’re looking for a delicious sourdough bread recipe, look no further. This yummy bread is crisp on the outside, loaded with texture and flavor on the inside, and simple to pull together.

At a Glance: Easy Homemade Sourdough Bread
👩🍳 Skill Level: Intermediate
🥄 Flavor Profile: Mildly tangy with a crisp crust and tender, open crumb
🧁 Options Could Include: Dutch oven boule, sandwich loaf, or freeform artisan loaf
🎯 Best For: Everyday sandwiches, toast, or beginner sourdough bakers looking for success
Is Sourdough Bread Hard to Make?
This seems to be the most common question when you talk to people about sourdough bread. Maybe you’ve tried in the past. . .and failed. I know I have! I covered all of that in my Simple Sourdough Starter post. Though I love to bake, and have conquered many cakes, cupcakes, cookies, scones, and so on. . .sourdough bread eluded me.
Oh, I had conquered several other breads. Like my challah. And my Easy Multigrain Seed and Nut Bread.
I’m particularly fond of my Tangzhong Milk bread, which is light and fluffy on the inside.
But, Sourdough?
I tried, y’all. I really tried. But I didn’t really overcome until I received this recipe (and some delicious starter) from my friend Dianie. With her starter and instructions I was (finally!) good to go.
So, I reached out to Dianie to ask if I could share her recipe and she agreed. Turns out it’s a common recipe used by many (and certainly loved by all).
Things to Know Before You Begin:
Sourdough is a Two-Day Process: I would be remiss if I didn’t say that up-front. The “work” takes place on day one and the baking takes place on day two. But trust me when I say it’s not hard work.
Sourdough requires proper timing. You’ll need to set your timer along the way as you make this bread.
You must “start” with starter. If you don’t already have a starter, you’ll have to create your own, which is (roughly) a ten-day process. I have a tutorial and recipe for that. But if you’re fortunate enough to have a great starter on hand (or some you can borrow from a friend) you’re ready to get started (pun intended).
With those things understood up front, it’s time to begin! Let’s talk about the ingredients you’ll need.
Sourdough Ingredients
You will find a full printable recipe card at the bottom of this post but here’s a quick peek at what you’ll need to make this sourdough. These are simple ingredients you probably already have in your kitchen.
- 100g starter (½ cup)
- 350g water (1 ½ cups)
- 500g all purpose flour (4 cups, scooped and leveled)
- 10g salt (1 ¾ teaspoons)
Disclaimer: This recipe was originally developed using weight measurements for accuracy. Flour can vary greatly depending on how it’s scooped (packed vs. loose), and sourdough starter densities can differ. For best results, use a digital kitchen scale. Cup conversions are provided for convenience but may affect texture and hydration.
Along with these ingredients you’ll also need the following supplies:
- Kitchen scale
- Large mixing bowl
- Danish dough whisk
- A bowl scraper
- Banneton proofing basket
- Bread Lame (scoring tool)
- Tea towel or cheesecloth
- Dutch oven
- Parchment paper sheet
How to Make Sourdough Bread

I’m going to include a sample schedule. Adjust to meet your needs.
DAY ONE:
8:00 AM
Start the day by feeding your starter using the 1:1:1 method (equal portions starter, room temperature water, and flour).


Example: 150 grams of starter, 150 grams of water, 150 grams of flour
Cover with plastic wrap, a tea towel, or cheesecloth. Let the starter sit for 4-5 hours until it doubles in size and turns bubbly. I heat up a cup of water for a minute in my microwave and then set my starter next to it.


12:00 PM
Check your starter to make sure it’s ready to go. Drop a pinch in some water. If it floats, you’re good to go!


Grab your kitchen scale and large bowl. I use an 8-cup glass pyrex, but you can choose whatever you like.
Measure 350 grams of room temperature water into mixing bowl.

Add 100 grams of your activate starter and whisk well using the bread whisk.

Add 500 grams of flour and 10 grams of salt.


Use the bread whisk to create a shaggy dough. It’s going to be sticky, but that’s what you want.

Use the bowl scraper to pull the excess dough away from the edges of the bowl.
Cover with a tea towel or cheesecloth and set aside for an hour to let dough rest.
1:00 PM
Perform your first round of stretch and folds. This is a simple process. Just wet your hands, reach down into the bowl and pull up the dough as far as you can, and fold it over to center. Rotate the bowl a quarter turn and repeat. Keep turning until you’ve stretched and folded all of the dough.

Loosely cover.
1:30 PM
Perform your second stretch and folds.
2:00 PM
Perform your third stretch and folds.
2:30 PM
Perform your fourth/final stretch and folds.
Cover dough and leave it proof for 4-5 hours (no longer than five hours). This period is called bulk fermentation. It's critical to the process because the sourdough starter begins to ferment the dough, producing carbon dioxide gas. This ultimately causes the dough to expand and develop flavor.
7:00 PM
Now that the dough has proofed it’s time to shape it into a boule (a ball). We all have our own methods for this, but I found a tutorial that might prove helpful to you. I’m learning from experience that the loaf-shaping is pretty critical to the outcome of the bread’s texture.
7:15 PM
Lightly flour your Banneton (rattan proofing) bowl. If you don't have one you can use a bowl. Set the boule inside. Cover with tea towel or cheesecloth and set in refrigerator.

DAY TWO:
8:00 AM
Place empty dutch oven (with lid) in oven and set temperature at 500 degrees Fahrenheit. Leave in oven for a full hour.

9:00 AM
Lower the oven temperature to 450 degrees Fahrenheit.
Remove banneton from refrigerator.
Crumple a piece of parchment paper and place it on top of the bowl.
Flip the dough ball out onto the wrinkled paper. Don't worry if it looks a bit flat. It should rise substantially during the first 20 minutes of the bake.
Use the lame to score the dough. A slight curve is all that’s necessary but you can get fancy if you like. Cut down about half an inch.

Using a hot pad remove the lid from the dutch oven (still in the oven), being careful not to burn yourself.
Use the parchment paper to gently set the dough ball into the pan.
Drop four ice cubes into the dutch oven under the edges of the parchment paper.
Put the lid back on and close the oven door.
Set time for 20 minutes.
After 20 minutes remove the lid and bake for another 20 minutes.
Your bread is now ready!
(Note: I took a steel wool pad to my Dutch Oven after this and got it shiny white again!)

Remove the dutch oven from the oven and set on a wire rack to cool.
After a few minutes, remove the dough (and parchment paper) from the dutch oven.

Allow to cool for at least an hour, or longer. I recommend an hour and a half. I enjoy checking the bottom of the loaf at this point. (You can thump it! It sounds like a drum!)

Slice the bread with a sharp bread knife.

Serve and enjoy!

Store at room temperature in a bread bag or a basket with tea towel on top. It will stay fresh for 2-3 days.
What to Expect from This Sourdough Bread Recipe
It's crisp on the outside, soft and fluffy on the inside, and has a lovely taste, as well! Best of all, it comes together seamlessly, as long as you follow the timeline listed here. Just make sure you start with an active starter.
That’s it for this post, friends! I hope you enjoyed this delicious recipe.
If you make this recipe and love it, don’t forget to leave a review and a comment below. And while you're at it, go ahead and pin some photos to your Pinterest boards!


Loved this recipe? Get more like it straight to your inbox. Sign up for our newsletter now!
About the Author
Janice Thompson is an author, baker, and all-around mischief maker! She has overcome a host of baking catastrophes, including a toppled wedding cake, to learn more about the baking process. Janice has published over 165 books for the Christian market but particularly enjoys writing recipes and baking devotions. To learn more about Janice or to drop her a note, visit her About the Author page.

Homemade Sourdough Recipe
Discover the secret to perfect homemade sourdough bread with this easy, no-fail recipe! With a crisp crust, soft interior, and deep tangy flavor, this step-by-step guide makes baking sourdough simple and rewarding.
Ingredients
- 100g starter (½ cup)
- 350g water (1 ½ cups)
- 500g all purpose flour (4 cups, scooped and leveled)
- 10g salt (1 ¾ teaspoons)
Instructions
- DAY ONE: 8:00 AM
Start the day by feeding your starter using the 1:1:1 method (equal portions starter, room temperature water, and flour).
Example: 200 grams of starter, 200 grams of water, 200 grams of flour
Let the starter sit for 4-5 hours until it doubles in size and turns bubbly. - 12:00 PM
Check your starter to make sure it’s ready to go. Drop a pinch in some water. If it floats, you’re good to go!
Grab your kitchen scale and mixing bowl. I use an 8-cup glass pyrex, but you can choose whatever you like.
Measure 350 grams of room temperature water into your mixing bowl.
Add 100 grams of your activated starter and whisk well using the bread whisk.
Add 500 grams of flour and 10 grams of salt.
Use the bread whisk to create a shaggy dough. It’s going to be sticky, but that’s what you want.
Use the bowl scraper to pull the excess dough away from the edges of the bowl.
Cover with a tea towel or cheesecloth and set aside for an hour. - 1:00 PM
Perform your first round of stretch and folds. This is a simple process. Just wet your hands, reach down into the bowl and pull up the dough as far as you can, and fold it over to center. Rotate the bowl a quarter turn and repeat. Keep turning until you’ve stretched and folded all of the dough.
Loosely cover. - 1:30 PM
Perform your second stretch and folds. - 2:00 PM
Perform your third stretch and folds. - 2:30 PM
Perform your fourth/final stretch and folds.
Cover dough and leave it proof for 4-5 hours (no longer than five hours) - 7:00 PM
Now that the dough has proofed it’s time to shape it into a loaf. We all have our own methods for this, but I found a tutorial that might prove helpful to you. https://www.youtube.com/watch?v=h7eqwYLv2tI I’m learning from experience that the loaf-shaping is pretty critical to the outcome of the bread’s texture. - 7:15 PM
Lightly flour your Banneton bowl. Set the loaf inside. Cover with tea towel or cheesecloth and set in refrigerator. - DAY TWO: 8:00 AM
Place empty dutch oven (with lid) in oven and set temperature at 500 degrees Fahrenheit. Leave in oven for a full hour. - 9:00 AM
Lower the oven temperature to 450 degrees Fahrenheit.
Remove banneton from refrigerator.
Crumple a piece of parchment paper and place it on top of the bowl.
Flip the dough ball out onto the wrinkled paper.
Use the lame to score the dough. A slight curve is all that’s necessary but you can get fancy if you like. Cut down about half an inch.
Using a hot pad remove the lid from the dutch oven (still in the oven), being careful not to burn yourself.
Use the parchment paper to gently set the dough ball into the pan.
Drop four ice cubes into the dutch oven under the edges of the parchment paper.
Put the lid back on and close the oven door.
Set time for 20 minutes.
After 20 minutes remove the lid and bake for another 20 minutes.
Your bread is now ready!
Remove the dutch oven from the oven and set on a wire rack to cool.
After a few minutes, remove the dough (and parchment paper) from the dutch oven.
Allow to cool for at least an hour, or longer. I recommend an hour and a half. I enjoy checking the bottom of the loaf at this point. (You can thump it! It sounds like a drum!)
Slice the bread with a sharp bread knife.
Serve and enjoy.
Store at room temperature in a bread bag or a basket with tea towel on top. It will stay fresh for 2-3 days.
Nutrition Information:
Yield: 12 Serving Size: 1Amount Per Serving: Calories: 152Total Fat: 0gSaturated Fat: 0gTrans Fat: 0gUnsaturated Fat: 0gCholesterol: 0mgSodium: 325mgCarbohydrates: 32gFiber: 1gSugar: 0gProtein: 4g
The nutrition information is a product of online calculators. I try to provide true and accurate information, but these numbers are estimates.
Greater love has no one than this, that someone lay down his life for his friends.
John 15:13 ESV


I’ve made this bread twice. It is delicious but the bottom crust is hard. What should I do differently.
Thank you for trying (not just once, but twice)! A couple of things you can try:
Preheat less time: If your Dutch oven sits in the oven for a long time before you add the dough, the base gets extra hot and can over-bake the bottom. Try shortening the preheat by 10–15 minutes. (Could be your oven gets hotter than mine.)
Use parchment: Place the dough on a sheet of parchment to give a thin buffer between the dough and the hot pan. (I'm assuming you already did this, but just in case...)
Double up pans: Set your Dutch oven on top of a baking sheet to deflect some of the direct heat from the oven floor. I actually keep a baking sheet in the bottom of my oven at all times to deflect heat.
Raise your oven rack: Moving your pan up a notch or two in the oven can help the bottom crust bake more evenly.
Cool in pan briefly: Once baked, let the loaf rest in the Dutch oven just 5 minutes, then transfer to a wire rack. Leaving it in the hot pot too long keeps baking the bottom. (Let me know if these suggestions work! Keep at it!)
Can you mix in other types of flour?
I have used all-purpose, bread flour, and/or wheat flour in my sourdoughs with success on all three.