Easy Gluten Free Sandwich Bread
If you’re gluten free but love bread, this is the post for you. In this post I’m going to show you how to make a simple gluten-free sandwich bread, perfect for every meal.

Can I Make Gluten-Free Bread?
Sure, you can purchase gluten-free breads at the grocery store. There are actually a lot of great options out there. But if you’re on a budget (who isn’t?) you might want to make it at home to save money.
Also, if you make it at home, you can control what goes into it. That, and you can change up the ingredients, adding seeds, nuts, herbs, and so on. (I’m crazy about seed and nut breads, myself.)
Whether you have celiac disease or you're sensitive to gluten, I have good news for you! There are multiple 21st century options, including today's recipe, which offers great results, whether it's your first time baking it or your 31st!
Gluten-Free All Purpose Flour
I’ve been using gluten-free 1:1 flour for a while now and I really love it! It really does help to start with a good product that you trust. I use the Bob's Red Mill brand but there are several out there. They usually contain potato starch, tapioca starch, and/or xanthan gum, key ingredients in gluten-free baking.
I recommend making this recipe with a 1:1 flour. I can’t guarantee how it will turn out if you use, say, just almond flour. I’m guessing it wouldn’t be very good. I haven’t had very good luck using just almond flour.
The point is, if you want to make breads, cakes, cookies, or other recipes, but without the gluten, these 1:1 flours make it a possibility. I found that to be the case with this simple bread recipe. If you're using any product that does not include xanthan gum you will want to add that to the recipe.
So, let's dive right in! If you're wanting to make sandwich bread, this is the recipe for you, (even if it's your first time to bake gluten-free)!
Easy Gluten-Free Sandwich Bread Ingredients

You will find a full printable recipe card at the bottom of this post but here’s a quick peek at what you’ll need. These are simple ingredients you might already have on hand in your pantry and refrigerator.
- warm water (80 - 100 degrees)
- rapid rise yeast
- flaxseed (optional)
- honey (or maple syrup)
- olive oil
- salt
- gluten-free all-purpose flour
- egg whites
How to Make this Simple Gluten-Free Sandwich Bread
You're going to love the simplicity of this homemade gluten-free bread recipe, I promise!
Before we begin, let me tell you two things:
- First, this is a wet, sticky dough. Don’t expect it to look like ordinary bread dough.
- Second, you won’t have to technically “knead” this dough, as gluten-free flours don’t need to form gluten strands. You do need to mix well enough to get it to come together.
Ready? Let's get going!
Combine the salt, gluten-free flour (1-1), salt, and flaxseeds. Whisk together and set aside.
Combine the warm water and yeast, as well as the honey, in a large bowl or the bowl of a stand mixer.

Whisk together. Set aside for five minutes to bloom, then add the olive oil (or oil of choice)
Now add the dry ingredients (gluten-free flour blend) to the wet.

It’s time to mix it all up. Remember what I said above: this dough will be wet and sticky and much looser than other bread doughs. For best results, don't add too much addition flour to firm it up.
You can use the dough hook on your mixer if you like, just long enough to get everything incorporated.

Add the egg whites, taking care to work them in completely.


Scrape down the edges of your bowl and move the (very wet) dough to a prepared loaf pan.

Cover with a tea towel and set in a warm place for about 30 - 45 minutes or until the dough begins to expand. This dough won’t double in size. Not even close. But 45 minutes should be plenty for proofing.
Note: gluten-free bread dough looks and reacts differently, which is why I suggest adding two packets of yeast.

About ten minutes before it goes into the oven, preheat to 350 degrees Fahrenheit. Score the top of the loaf. (I forgot to do this and mine split off on the sides.)
Place the pan into the oven and bake for 35 - 45 minutes or until lightly golden brown.
Remove and place on a wire rack to cool. After about ten minutes turn the bread out of the pan to continue cooling. Don’t attempt to slice this bread until it is completely cooled.
Once cooled, slice and serve! Be sure to use a bread knife for proper cutting. Otherwise you’ll destroy your loaf.

Store in an airtight container or in a large baggie. I keep mine in the fridge but you can leave it at room temperature for 2 - 3 days. (You can freeze this bread up to two months, tightly wrapped in plastic wrap or stored in a freezer bag.)
What to Expect from this Bread

I wasn’t sure what to expect, honestly. I have never made gluten-free bread before so I couldn’t imagine it would come together like a proper loaf of bread.
I was wrong! It did, in fact, come together! First of all, it was so simple to make. This is truly an easy gluten-free bread recipe, especially because it only requires one rise. No hard work here! You won't even break a sweat.
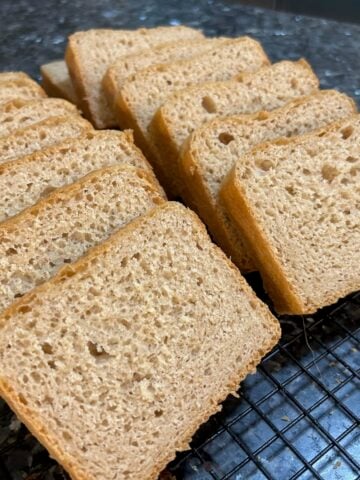
I sliced the loaf in half so that I could get a good look at the center. What did I fine? A lovely crumb, great texture, and fluffy interior—just what you would hope for in any sandwich bread.

As I mentioned above, I forgot to score mine, so I had to use great care slicing. You’ll do a better job than I did. But even if you don’t, the bread still slices fine. And it has a great taste. My granddaughter thought it was a wee bit salty, but I disagreed. So, add the amount of salt you prefer.
It’s great to know I have gluten-free bread options. I’m not going gluten free but I am trying to eat healthier, so these types of changes on occasion are a good choice. Overall, I would say this recipe was a success. Yay!
Variations on this Recipe
Because this is a good base recipe, I can see using it in a variety of ways. Here are some things that come to mind:
Cinnamon-Sugar Loaf: It would be fun to add half of the dough to the pan, then add a layer of cinnamon/sugar, then the rest of the dough. You could sprinkle sugar and cinnamon on top before baking. Yum!
Seed and Nut Bread: Add half a cup of seeds or nuts. Here are a few suggestions: sesame, poppy, sunflower, pumpkin, pistachios, etc. You can even use quinoa (as I did in my Copycat Dave’s bread recipe) but you’ll need to rinse it first.
Artisan Style: If you don’t want to bake this in a loaf pan, you can try to shape it into a ball and place it in a Dutch oven (with parchment paper). I haven’t tried this method with this particular dough but it worked well with my glutinous artisan bread.
Herbs: If you like, you can add herbs like rosemary, thyme, dill, and so on. Your loaf can take on any flavors you like. Sometimes (like in my multi-grain seed and nut bread) I even add minced garlic to the dough. (It’s delicious!) Another option is a packet of ranch dressing (dry mix). That adds a ton of flavor to your bread.
Milk in place of water: I haven't tried this but I would imagine you could add almond milk, coconut milk, or any other plant-based milk you like.
Other Gluten-Free Options from Out of the Box Baking
This is an amazing recipe, and I have even more options for gluten-free baking, too! As always, you will have to be responsible to chose products that are labeled gluten-free.
- Easy Gluten-Free Chocolate Cake
- Gluten-Free Banana Nut Muffins
- No Bake Chocolate Oat Bars
- Gluten-Free Brownies with Mint Chocolate
- Foolproof Hashbrown Frittata
That’s it for this post, friends! I hope you enjoyed this delicious gluten-free sandwich bread recipe.
If you make this recipe and love it, don’t forget to leave a review and a comment below. And while you're at it, go ahead and pin some photos to your Pinterest boards!


About the Author
Janice Thompson is an author, baker, and all-around mischief maker! She has overcome a host of baking catastrophes, including a toppled wedding cake, to learn more about the baking process. Janice has published over 165 books for the Christian market but particularly enjoys writing recipes and baking devotions. To learn more about Janice or to drop her a note, visit her About the Author page.

Gluten Free Sandwich Bread
If you’re gluten free but love bread, this is the post for you. In this post I’m going to show you how to make a simple gluten-free sandwich bread, perfect for every meal.
Ingredients
- 1 ½ cups warm water (80 - 100 degrees)
- 2 packets rapid rise yeast
- 1 tablespoon flaxseed (optional)
- ¼ cup honey (or maple syrup)
- ¼ cup olive oil
- 2 teaspoons salt
- 3 - 3 ½ cups gluten-free all-purpose flour
- 2 egg whites
Instructions
Combine the warm water and yeast, as well as the honey, in a large bowl or the bowl of a stand mixer.
Whisk together. Set aside for five minutes to bloom.
In a separate bowl, combine the salt, gluten-free flour (1-1), salt, and flaxseeds. Whisk together.
Add the olive oil to the wet ingredients.
Now add the dry ingredients to the wet.
It’s time to mix it all up. Remember what I said above: this dough will be wet and sticky and much looser than other bread doughs. You can use the dough hook on your mixer if you like, just long enough to get everything incorporated.
Add the egg whites, taking care to work them in completely.
Scrape down the edges of your bowl and move the (very wet) dough to a prepared loaf pan.
Cover with a tea towel and set in a warm place for about 30 - 45 minutes or until the dough begins to expand. This dough won’t double in size. Not even close. But 45 minutes should be plenty for proofing.
About ten minutes before it goes into the oven, preheat to 350 degrees Fahrenheit.
Score the top of the loaf. (I forgot to do this and mine split off on the sides.)
Place the pan into the oven and bake for 35 - 45 minutes or until lightly golden brown.
Remove and place on a wire rack to cool.
After about ten minutes turn the bread out of the pan to continue cooling.
Don’t attempt to slice this bread until it is completely cooled.
Once cooled, slice and serve! Be sure to use a bread knife for proper cutting. Otherwise you’ll destroy your loaf.
Store in an airtight container or in a large baggie. I keep mine in the fridge but you can leave it at room temperature for 2 - 3 days. (You can freeze this bread up to two months.)