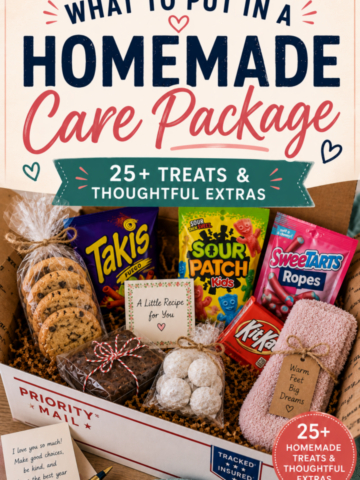
How to Decorate Easter Cookies
If you're looking for fun cookie ideas for Easter, we've got you covered! Keep reading if you want to discover the best cut-out sugar cookie recipe and decorating hacks to design your own hand-painted Easter cookies!

At a Glance: How to Decorate Easter Cookies
👩🍳 Skill Level: Beginner to intermediate
🥄 Flavor Profile: Sweet, buttery sugar cookies with smooth vanilla royal icing
🧁 Options: Pastel piping, flooding techniques, sprinkles, edible glitter
🎯 Best For: Easter baskets, spring parties, kids’ activities, or cookie exchanges
Why Make Easter Cookies?
Hand-Painted Easter cookies are bright, colorful, and packed full of flavor! And the designs are endless, as you are about to see.
No doubt you've stumbled upon this post because you want to learn how to make and decorate some of these gorgeous sugar cookies for your Easter guests. You're in the right place! I'm going to give you the cookie recipe, the royal icing recipe, tips for decorating with royal icing, and some colorful and creative design ideas.
My Sugar Cookie Story
I've been hand-painting Easter cookies for years but it took quite a while to come up with the perfect recipe. You don't even want to know how many I tried before I finally developed my own. Trust me, it's the perfect recipe for this project!
And what's a great sugar cookie without that layer of sweet royal icing on top? It's truly the perfect "paint" to color these cookies and bring them to life.
Best of all, the process doesn't have to be intimidating. You don't have to be a pro to decorate like a pro. (Win!)
Not Just for Kids
These cookies are loaded with color and flavor, which means the kids will love them. (In fact, you could even host a baking day with the kids and get their help!)
But don't think these are just for kids. This recipe is definitely loved by adults, as well. In fact, I use this very same recipe for my wedding cookies, birthday cookies, and so on.
Best of all, these Easter cookies make perfect gifts--for teachers, church friends, neighbors, and so on. Bake, decorate, dry, and place in pretty cellophane bags to give your friends and loved ones. They'll marvel at how darling these cookies are!
What Cookie Cutters will I Need?

Here are some of my go-to cutters for Easter:
- Large oval cutter (this is good for Easter eggs and chicks, as well as other cookies)
- Bunnies (you can find these in profile form or bunny faces)
- Flowers (I love springtime flowers with my Easter cookie displays)
- Butterflies (Nothing says springtime like colorful butterflies!)
- Carrots (my personal favorite for Easter)
- Small chicks (you can find a variety of these in stores or online)
- Cross (the possibilities are endless with cross cookies)
Everyone loves these delicious sugar cookies. So, what are we waiting for? Let's start by looking at the recipe.
The Best Cut-Out Sugar Cookie Recipe

I've been using this same recipe for a dozen years now and it has never failed me. It works perfectly every time and I know you'll find it flawless for your Easter cookies.
Sugar Cookie Ingredients

You will find a full printable recipe card at the bottom of this post but here's a quick look at what you'll need to make these delicious and beautiful Easter cookies:
- 2 sticks (1 cup) room temperature butter (salted or unsalted, your choice)
- 1 cup powdered sugar
- ½ cup granulated sugar
- 1 extra-large egg
- 1 teaspoon pure vanilla extract
- ½ teaspoon almond extract
- 3 cups all-purpose flour
- 1 teaspoon baking powder
Royal Icing Ingredients

- 3 tablespoons wilton meringue powder
- ½ cup + 2 tablespoons water
- 2 pound bag powdered sugar
- 1 teaspoon clear vanilla
- ½ teaspoon almond extract
Let's Bake some Easter Sugar Cookies!
- Preheat oven to 375 degrees Fahrenheit.
- Prep two cookie sheets with parchment paper.
- Place room temperature butter into a large mixing bowl or bowl of a stand mixer with paddle attachment. Cream for 2-3 minutes or until light and fluffy.
- Add sugars and vanilla and continue to beat.
- Add egg and mix well.
- Add flour and baking powder and mix only until it comes together. This is a dense batter, so don't over-work your mixer.
- Remove the dough and press into a ziplock bag. I usually flatten mine to look like a large square. Place in freezer for 10 - 15 minutes to firm up.
- Remove dough from freezer and roll out the cookies. I've got a full tutorial for this process. It's really so simple!
- Use cutters to cut out the shapes you like.
- Place on parchment lined baking sheet and place in preheated 375-degree oven. Bake for 10 - 11 minutes or until set. You don't want to over bake these.
Let's Make the Royal Icing
Some folks are intimidated by royal icing but there's no need to be. Here's how I make mine:
- Place three tablespoons Wilton meringue powder, water, and both extracts into a mixing bowl with paddle attachment. Beat for 2-3 minutes. Add the full bag of powdered sugar and mix on low speed for 3-4 minutes until a thick paste form.
- You will need to add a bit of water to your Icing to get the consistencies you need. There are two primary consistencies I use for these cookies:
Flood Icing (known as 10-second icing: it should take about 10 seconds for the gap to close after you run a knife through it)
Piping Icing: (about the consistency of toothpaste, this is what you use to outline and detail the cookies).
I have a full tutorial for royal icing here.
You're going to want to mix your icing and get it to the consistency you need before dividing into small bowls to color. I use Americolor coloring gels to color my royal icing. You can really bright, true colors this way. (Gel colors are best for royal icing.)
Make sure you get all of the bubbles out of your icing before you place into piping bags or bottles. (More on how to use bags and bottles here.)
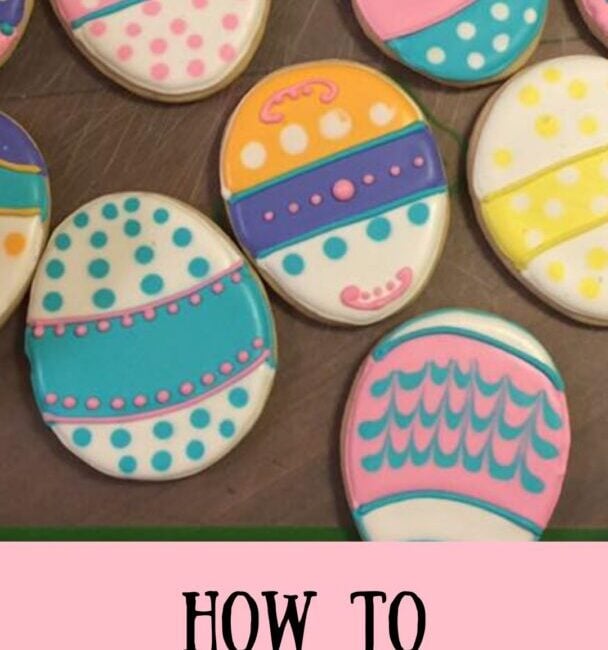
Let's Decorate Some Easter Egg Cookies!

These delightful oval-shaped cookies are decorated to look like Easter eggs, featuring pastel icing, delicate piping, and fun sprinkle designs. A perfect addition to any Easter basket! And they start with a fun technique called wet-on-wet.
How to Decorate Them:
If you've checked out my royal icing post you already know about my wet on wet technique. It's my most used technique of all. Basically you lay down a bottom layer of flood icing. Then, while it's still wet, you add polka dots in other colors. The wet-on-wet technique gives you a lovely effect that's so pretty!
For a few of my Easter eggs cookies I incorporated this technique. For others, as you can see, I simple divided my colors into sections.
Caution: You have to allow time for icing to set up before adding a nearby color. I usually stagger these, doing a little at a time.


It's always fun to outline sections of the cookies using piping icing in alternate colors. This is a great way to make the colors pop!
It's also a blast to alternate wet-on-wet polka dots with piping-consistency polka dots. Mix it up! Make it fun!
And by the way, the piping consistency as a crisp "bite" to it, so you can a great eating experience when you add different types of icing.


Let's Decorate some Oval Chick Cookies!

Bright and cheerful, these adorable oval cookies are decorated to resemble fluffy little chicks popping out of their shells, ready to face the world on Easter morning!
Complete with yellow icing, tiny beaks, and sweet little eyes, these are a fun, colorful, and tasty treat for springtime celebrations!
How to Decorate Them:
The goal of these cookies is to make the bottom half look like a shell, which means you need to fill it first with white flood icing. I added some wet-on-wet polka-dot to mine.
Once the white icing has set up (about half an hour) you can color the top with yellow flood icing.
Now it's time to wait! You need to make sure your cookies are dry before you pipe on the details (the eyes, beat, and outline).
Aren't they sweet?


Maybe you want to make "regular" chick cookies out of ovals, skipping the egg at the bottom. It's super simple! Just paint your cookie with yellow flood icing, let it dry, then add the details.


Let's Decorate some Bunny Cookies!

These charming bunny-shaped cookies are decorated with soft pastel icing, cute whiskers, and tiny noses. The perfect sweet treat to bring a little Easter magic to your dessert table!
How to Decorate Them:
These come together so easily! Start by flooding the cookies in any color you like. I went with pastels. Then, while the icing is still loose, add polka-dots.
Now come the hard part! Let them dry for a couple of hours before adding the details. I like to add a cute little tail, a bow at the neck, and the eye. That's it! So simple and cute!


I have a couple of different bunny cutters so I thought it would be fun to show you another similar bunny design. This time I started with white flood and colorful polka-dots.

No doubt you noticed the bunny face cutters, as well. Those are always fun. For those, you lay down the white base coat, let it dry, then come on top with more icing for the ears, cheeks, nose, eyes, and whiskers. So fun!

Let's Decorate some Butterfly Cookies

These elegant butterfly cookies are decorated with delicate pastel icing and intricate wing designs, making them a whimsical and colorful addition to your Easter dessert table!
I know it's not nice to play favorites, but butterfly cookies are absolutely my favorite to make! I just love adding all of that color!
How to Decorate Them:
I start with the flood icing. As you can see, the level of color will depend on the project. Let the flood layer harden (about two hours) before piping on the details with piping icing.


Let's Decorate some Spring Flower Cookies

Springtime blooms come to life with these beautifully decorated flower-shaped cookies. With vibrant icing and intricate petal details, they’re a delightful way to brighten up your Easter spread!
How to Decorate Them:
I like to choose different floral cutters, but you can use whatever you like. For the tulips above, I started with a layer of flood icing, and incorporated the wet-on-wet technique, not just with polka-dots, but with swirling in additional color.
For the colorful daisies below I started with white flood icing, let it dry, then came back on top of it with colorful flood icing. I used the wet-on-wet polka dot technique, as you can see, and had a blast doing it!


Let's Decorate some Carrot Cookies

These fun and festive carrot cookies are topped with vibrant orange icing and green leafy tops. A playful and delicious way to add some Easter charm to your cookie platter!
How to Decorate Them:
Use orange flood icing with white polka-dots. Allow to dry then add the piped curl in orange (toothpaste consistency) and the green leaves (using a leaf tip and green frosting in piping consistency).
That’s it for this post, friends! I hope you enjoyed this delicious recipe.
If you make this recipe and love it, don’t forget to leave a review and a comment below. And while you're at it, go ahead and pin some photos to your Pinterest boards!


Loved this cookie recipe and tutorial? Get more like it straight to your inbox. Sign up for our newsletter now!
About the Author
Janice Thompson is an author, baker, and all-around mischief maker! She has overcome a host of baking catastrophes, including a toppled wedding cake, to learn more about the baking process. Janice has published over 165 books for the Christian market but particularly enjoys writing recipes and baking devotions. To learn more about Janice or to drop her a note, visit her About the Author page.

Cut-Out Sugar Cookies
Ingredients
- 2 sticks (one cup) salted butter (room temperature)
- 1 extra-large egg (must be extra-large)
- 1 cup powdered sugar
- ½ cup granulated sugar
- 1 teaspoon clear vanilla
- ½ teaspoon almond extract
- 3 cups flour
- 1 teaspoon baking powder
Instructions
Cream together the two sticks of butter. Add the sugars and egg, mixing well.
Next, add vanilla and almond extracts.
In a separate bowl whisk together the flour and baking powder. Add in increments to the creamy mixture, fully combining.
Chill the dough, and then roll using one of the methods indicated above (roller with detachable rings or doubled paint sticks).
Bake at 375 for ten minutes or your preference. Don’t over-bake.
Nutrition Information:
Yield: 30 Serving Size: 1Amount Per Serving: Calories: 83Total Fat: 1gSaturated Fat: 1gTrans Fat: 0gUnsaturated Fat: 0gCholesterol: 10mgSodium: 26mgCarbohydrates: 17gFiber: 0gSugar: 7gProtein: 2g
The nutrition information is a product of online calculators. I try to provide true and accurate information, but these numbers are estimates.

Easy Royal Icing
This simple and delicious royal icing is perfect for decorating those yummy cut-out sugar cookies.
Ingredients
- 3 tbl meringue powder
- ½ cup + 2 tablespoons water
- 1 teaspoon cream of tartar (omit this if you’re using Wilton’s meringue powder)
- 2 teaspoon clear vanilla extract
- ½ teaspoon real almond extract
- One bag powdered sugar (7 – 8 cups)
Instructions
- Put all items except powdered sugar into a mixing bowl. Mix until frothy (less than a minute).
- Add full bag powdered sugar and mix until incorporated (a few seconds).
Turn mixer on low and beat for five minutes non-stop until the icing is meringue-like in texture. Immediately cover with plastic wrap (touching the icing) and a damp towel above that. - Now it’s time to color your icing. Scoop out about a cup of the icing into a small bowl and add your coloring gel.
- (Note: Don’t use water-based food colorings, as they add liquid to the recipe.) Mix thoroughly.
- Add tiny drops of water until you get the colored icing to piping (toothpaste) consistency.
- Scoop out half of it and put it into a piping bag with #2 tip. With the remaining icing in the bowl, add tiny bits of water (stirring non-stop by hand) until it reaches honey consistency.
- You know you’ve reached the right consistency when you can drag a knife through it and it takes about 10 seconds for the line to close up again.
- You can either put this flood consistency icing in a piping bag with a #2 tip or a tipless bag. You can also use a food-safe craft bottle with tip, but be aware that flooding with the bottle method often leads to air bubbles in the icing.
- Repeat the above process making different colors.
Notes
For more on the decorating process, see my Tips for Cookie Decorating post.